1. Product Introduction
Based on MediaTek MT7628 designed for smart electric car, a model created light weight micro development Embedded Gateway product. DSGW-030-AUTO gateway has powerful low-power Bluetooth connection capabilities, fully satisfied connection requirements for in-car aftermarket sub-devices and camping scene sub-devices. Otherwise gateway support Openwrt system, it is convenient for customers to connect the vehicle-cloud MQTT and vehicle-body MQTT servers, suitable for use in industry scenarios of in-vehicle Internet of Things.
| Name | Describe |
|---|---|
| Product Model | DSGW-030-LD |
| CPU | MT7628DAN |
| RAM | 64MB |
| FLash | 32MB |
| System | Android 12 |
| Network Port | 1 10/100Mbps Ethernet test point |
| USB2.0 Interface | 1 USB2.0 interface |
| Wi-Fi | IEEE 802.11b/g/n, Channel 1~13, 2400MHz~2483.5MHz, 1 PCB antenna |
| BLE | Support Bluetooth 5.2, 2402MHz~2480MHz, 1 Ipex antenna |
| Debug Interface | Support 1 UART interface on board |
| Button | 1 function button |
| 1 soft reset button | |
| LED | Yellow light flashes: Bluetooth signal connected |
| Red light is always on: Not connected to the server properly | |
| Green light is always on: Normal connection to the server | |
| Power Supply | DC power supply voltage range 12V/2A and battery power supply voltage range 9V to 12V |
| Operating Temperature | -10℃~55℃ |
| Storage Temperature | -40℃~70℃ |
| PCBA Dimensions | 64.8*64mm |
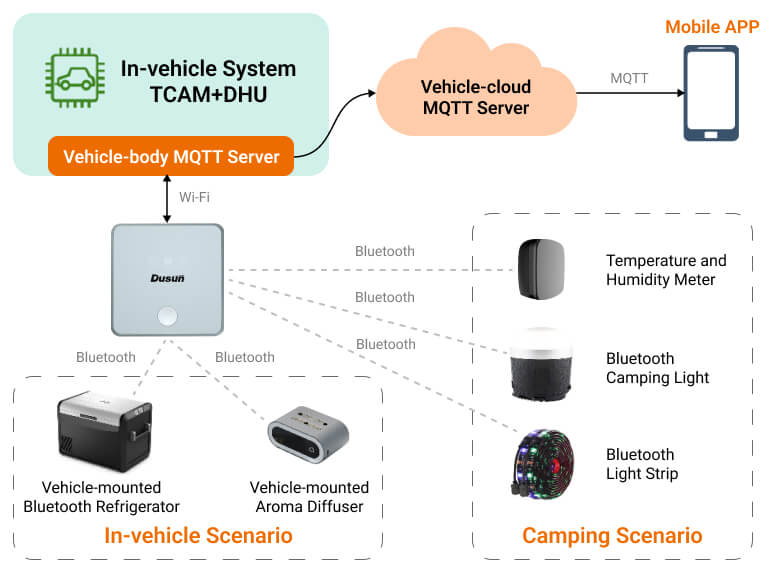
■ Functional description of vehicle IoT scenarios:
1). Intelligent vehicle control ecosystem
The DSGW-030-AUTO gateway reads and controls Bluetooth refrigerators and car fragrance devices in the car through Bluetooth, and processes data locally on the car system, integrates the car control ecosystem, executes various smart scenarios, customizes smart car life, and achieves the best car intelligent control experience.
2). Smart camping
DSGW-030-AUTO opens BLE API, supports the access of various types of BLE devices, and realizes intelligent remote control of camping scenes through mobile phone APP through the cloud MQTT server.
■ Dusun In-vehicle IoT Gateway Advantages:
1). Car body + car cloud data communication
DSGW-030-AUTO is connected to the EMQ service to realize the synchronous data processing of the vehicle body MQTT server + vehicle cloud MQTT server, which can realize the intelligent and fast control of the vehicle computer in seconds. In addition, in areas without network coverage, intelligent vehicle control can still be performed locally through the vehicle computer.
2). Custom BLE Driver
Through Dusun’s many years of experience in IoT device access, the gateway-side BLE driver is optimized, and the provided BLE API can quickly become compatible with various types of BLE devices, enabling rapid access to new devices that support subsequent scenario expansion without the need for OTA.
3). Dual scene usage inside and outside the car
DSGW-030-AUTO has a dual power input design, supports the in-car 12VDC power interface and the standard type C interface. The product is compact and easy to disassemble and assemble, making it suitable for use in both in-car and out-of-car scenarios.
Dusun integrates the standard systemIn-vehicle IoTIndustry-related applications, customized high-reliability operating systems and industry SDKs, with many years of experience in the development and design of embedded motherboards, complete the transplantation and testing of a variety of hardware peripheral drivers that meet the industry. The following is the software framework of the default Openwrt system of DSGW-030.
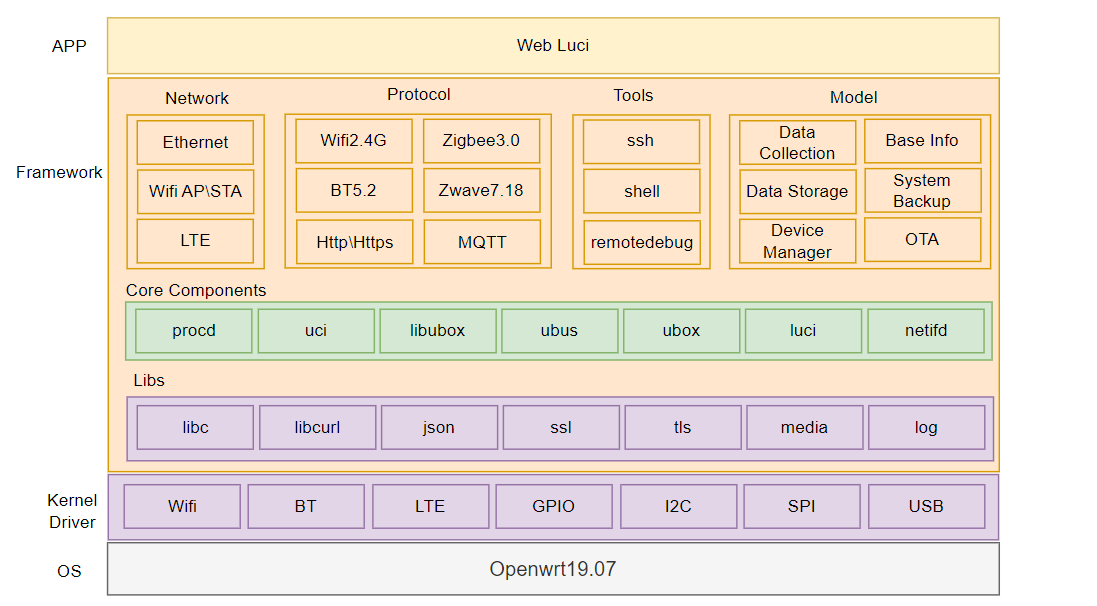
Dusun provides industry SDK source code that matches the motherboard, supporting customers to conduct micro-development to achieve rapid productization.
Dusun SDK has the following features:
1). Streamlined operating system:
On the premise of meeting industry applications, the number of components is streamlined, the system resource utilization rate is high, thereby reducing hardware costs, and to a certain extent, the functional structure is optimized, the system architecture is reasonably laid out, and the system is more efficient and easy to maintain;
2). BSP with industry attributes:
According to the types of peripheral devices used in the industry, we transplant and debug the drivers and adapt the industry algorithms to meet the customers’ needs for selecting the overall hardware + algorithm solution. In addition, Dusun BSP driver will continue to iterate the access to peripheral devices of different brands and models.
3). Strong scalability:
By installing additional software packages or writing custom code, the functions of MT7628 can be expanded according to specific needs to adapt it to different in-vehicle application scenarios.
| Peripherals | Model | Illustrate |
|---|---|---|
| Power Supply | -- | DC12V/DC-5V/2A |
| Matching peripheral hardware | Model | Illustrate |
|---|---|---|
| Car Fragrance | Customer Model | Bluetooth BLE, can be directly connected |
| Car Refrigerator | Customer Model | Bluetooth BLE, can be directly connected |
| Camping lights | Customer Model | Bluetooth BLE, support RGB dimming |
| Light Strip | Customer Model | Bluetooth BLE, support RGB dimming |
| Temperature and humidity sensor | DSBC-060 | Bluetooth, temperature and humidity sensor |
The default connection is to the EMQX MQTT server platform, and the reserved API interface can be connected to the customer’s private cloud and third-party cloud.
2. Installation Instructions
⚠️:This section describes the product packaging form (boxed/antistatic bag, etc.?), packaging size, unit weight, packing instructions, etc.
1). Describe the type of box: airplane box, top and bottom box, double-insert box, buckle bottom box, drawer box;
2). Describe the type of bag: bubble bag, flat bag, sealed bag;
3). State the weight of the complete machine (excluding accessories), with one decimal place and tolerance;
4). Describe the packing situation: how many boxes are in a box, how they are arranged, and provide illustrations.
⚠️:This section describes the factory accessories list of the product
1). Use graphic description + list to describe the factory accessories of the whole machine;
2). If necessary, explain how to use the accessories, such as how to install them, installation precautions, etc.
⚠️:This section describes the installation method and installation precautions of the product. If the product is a complete machine, use diagrams to describe the appropriate installation method and installation steps. If the product is a PCBA, describe the fixed space and air avoidance rules, radiator installation, etc.
1). Whole machine status before leaving the factory: Use graphic description + text description to explain the installation method and steps of the product, and especially emphasize precautions, etc.
2). Module status at the factory: Describe the module installation method, precautions, recommended hole opening values, etc. If necessary, we can use graphic descriptions to recommend customers to assemble the module according to the structure recommended by our company.
⚠️: Use 2D wireframes to quickly describe the product dimensions. Also provide a link to download the 3D product image.
1). Use the simplest wireframe to describe the key dimensions of the product and indicate the tolerances;
2). Integrate the product into a “part state” and provide 3D drawings (STP format).
3. Hardware Instructions
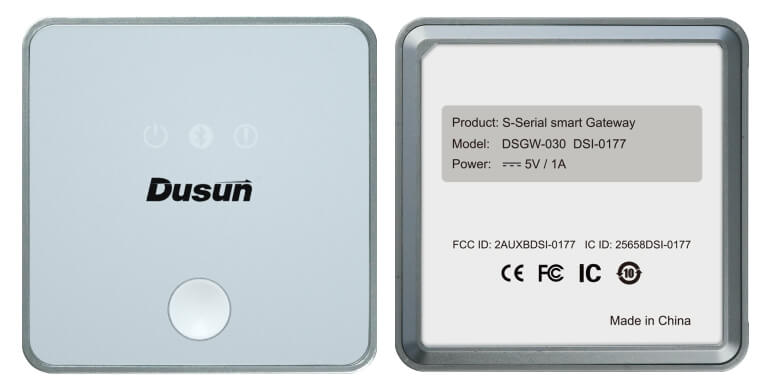
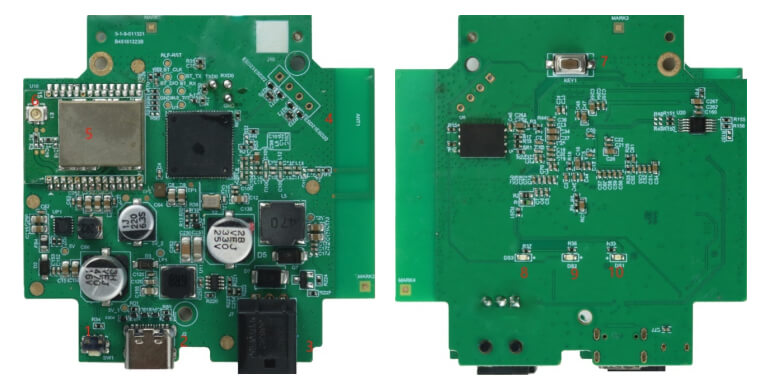
| Serial number | Describe | Remark |
|---|---|---|
| 1 | Reset button | For restoring factory settings |
| 2 | USB TYPE-C interface | Used to provide power to the motherboard |
| 3 | DC 12V interface | Used to provide power to the motherboard |
| 4 | Network port debugging interface | Used to upgrade the system with the server |
| 5 | BLE Module | The module is on the mainboard and the interface is not external. |
| 6 | BLE module ipex socket | Used to connect BLE module and built-in FPC antenna |
| 7 | button | WIFI network configuration button |
| 8 | Red LED light | Used to show that the server is not connected properly |
| 9 | Green LED light | Used to display the normal connection server |
| 10 | Yellow LED light | Used to display Bluetooth signal access |
The board uses Type-C and DC12V dual interfaces to power the system.
① The pin sequence of TYPE-C J2 on PCBA is shown in the figure below:

The pin function definitions are as follows:
| Serial number | Pin Name | Pin Description | IO Level | Remark |
|---|---|---|---|---|
| A1 | GND | Power Ground | 0V | Gateway external 5V power supply |
| A4 | VBUS | Power positive | 5.0V | |
| A5 | CC1 | Channel 1 detection | 5.1K resistor from the slave to ground | |
| A6 | DP1 | USB2.0 differential signal, positive of channel 1 | This gateway reserves functions for software upgrade | |
| A7 | DN1 | USB2.0 differential signal, negative of channel 1 | ||
| A8 | SBU1 | Auxiliary functions of channel 1 | ||
| A9 | VBUS | Power positive | 5.0V | Gateway external 5V power supply |
| A12 | GND | Power Ground | 0V | |
| B1 | GND | Power Ground | 0V | |
| B4 | VBUS | Power positive | 5.0V | |
| B5 | CC2 | Channel 2 detection | 5.1K resistor from the slave to ground | |
| B6 | DP2 | USB2.0 differential signal, positive of channel 2 | This gateway reserves functions for software upgrade | |
| B7 | DN2 | USB2.0 differential signal, negative of channel 2 | ||
| B8 | SBU2 | Auxiliary functions of channel 2 | ||
| B9 | VBUS | Power positive | 5.0V | Gateway external 5V power supply |
| B12 | GND | Power Ground | 0V |
② The pin sequence of DC12V interface J7 on PCBA is shown in the figure below:

The pin function definitions are as follows:
| Serial number | Pin Name | Pin Description | IO Level | Remark |
|---|---|---|---|---|
| 1 | NC | Empty feet | NC | |
| 2 | GND | Negative power supply | 0V | Gateway external 12V power supply |
| 3 | VCC | Power positive | 12V |
① The pin sequence of RJ45 interface J10 on PCBA is shown in the figure below:

The RJ45 interface is a reserved row of pinholes, the order of which is shown in the figure above, and the pin functions are defined as follows:
| Serial number | Pin Name | Pin Description | IO level | Remark |
|---|---|---|---|---|
| 1 | TXN | The master network port transmits positive | Reserved for software upgrade | |
| 2 | TXP | The main control network port transmits negative | ||
| 3 | RXN | The master network port receives positive | ||
| 4 | RXP | The master network port receives negative |
There are two buttons on the PCB, SW1 is the reset button and KEY1 is the network configuration button.
① The location of the reset button interface SW1 on the PCBA is shown in the figure below. Press and hold for 10 seconds to perform the reset operation.

② The location of the network configuration button interface KEY1 on the PCBA is shown in the figure below. Press KEY1 WIFI to re-configure the network.

① Three test points TXD0/RXD0/GND are reserved on the mainboard as the lead-out points of the debug serial port, as shown below:

② The mainboard has reserved Bluetooth burning and debugging test points, as shown below:

① The WIFI function of the gateway is realized by the main control chip shown in the figure below. The RF output of the main control chip U1 is as shown in the figure below, using an onboard single antenna.

The WIFI module supports IEEE802.11b/g/n, 300Mbps data rate. It uses a single onboard antenna.
① The BLE function of the gateway is implemented by the BLE module shown in the figure below. The pin definition of BLE module U10 is as follows:

The pin function definitions are as follows:
| Serial number | Pin Name | Pin Description | IO level | Remark |
|---|---|---|---|---|
| 1 | GND | Systematically | 0V | |
| 2 | ANT | Antenna signal terminal | External RF signal port | |
| 3 | GND | Systematically | 0V | |
| 4 | NC | |||
| 5 | PA0 | GPIO Pins | 3.3V | Can be used for GPIO port applications |
| 6 | PC5 | GPIO Pins | 3.3V | Can be used for GPIO port applications |
| 7 | PC4 | GPIO Pins | 3.3V | Can be used for GPIO port applications |
| 8 | PA3 | GPIO Pins | 3.3V | Can be used for GPIO port applications |
| 9 | PA4 | GPIO Pins | 3.3V | Can be used for GPIO port applications |
| 10 | PC1 | GPIO Pins | 3.3V | Can be used for GPIO port applications |
| 11 | PC0 | GPIO Pins | 3.3V | Can be used for GPIO port applications |
| 12 | PD4 | GPIO Pins | 3.3V | Can be used for GPIO port applications |
| 13 | PD3 | GPIO Pins | 3.3V | Can be used for GPIO port applications |
| 14 | PD2 | GPIO Pins | 3.3V | Can be used for GPIO port applications |
| 15 | NC | |||
| 16 | NC | |||
| 17 | PB0 | GPIO Pins | 3.3V | Can be used for GPIO port applications |
| 18 | PB1 | GPIO Pins | 3.3V | Can be used for GPIO port applications |
| 19 | NC | |||
| 20 | GND | Systematically | 0V | |
| 21 | VCC3V3 | System Power | 3.3V | Module power supply positive electrode |
| 22 | RX0 | Serial port receiving signal | 3.3V | Serial signal input |
| 23 | TX0 | Serial port sends signal | 3.3V | Serial signal output |
| twenty four | SWDIO | JTAG Data Port | 3.3V | JTAG debug port |
| 25 | SWCLK | JTAG clock port | 3.3V | |
| 26 | PC3 | GPIO Pins | 3.3V | Can be used for GPIO port applications |
| 27 | PC2 | GPIO Pins | 3.3V | Can be used for GPIO port applications |
| 28 | nRESET | Module reset pin | 3.3V | Module reset function pin |
There are three status indicators on the motherboard, namely DS1, DS2 and DS3. The three status indicators are observed through the light guide on the shell. The positions of the three status indicators on the PCBA are shown in the figure below.

| Serial number | name | color | state | Remark |
|---|---|---|---|---|
| 1 | DS1 | green | Display status can be user defined | Green light is always on: Normal connection to the server |
| 2 | DS2 | yellow | Display status can be user defined | Yellow light flashes: Bluetooth signal connected |
| 3 | DS3 | red | Display status can be user defined | Red light is always on: Not connected to the server properly |
4. Software Instructions
The motherboard has a software button by default, which can be modified according to customer needs.
By default, when the button is pressed, the system will call /etc/rc.button/BTN_0 script:
1). Short press and release to turn on the hotspot
2). Press and hold for 5 seconds and then release to restore the factory settings.
					#!/bin/sh
./lib/functions.sh
./lib/functions/leds.sh
if [ "${ACTION}" == "pressed" ];
then
    touch /tmp/BTN_0_pressed
    touch /tmp/btn1
else
    rm -f /tmp/BTN_0_pressed
fi

if [ -f /tmp/dusun_upgrade ] ; then
    exit 0
fi

[ ! "${ACTION}" == "released" ] && {
    exit 0
}

[ "$SEEN" -ge 5 ] && {
    logger "factory reset.."
    led_off zigbee
    led_off pwrled
    led_off errled
    led_timer zigbee 200 200
    led_timer pwrled 200 200
    led_timer errled 200 200
    logger "FACTORY RESET"
    #jffs2reset -y && reboot &
    firstboot -y && reboot &
    exit 0
}

[ "$SEEN" -ge 0 ] && {
    logger "Open Default Ap"
    uci set /etc/config/wireless.radio0.disabled=0; uci commit wireless;
    uci set /etc/config/wireless.ap0.hidden=0; uci commit wireless;
    #/etc/init.d/network restart;
    /etc/init.d/uhttpd restart
    Wi-Fi &
    exit 0
}
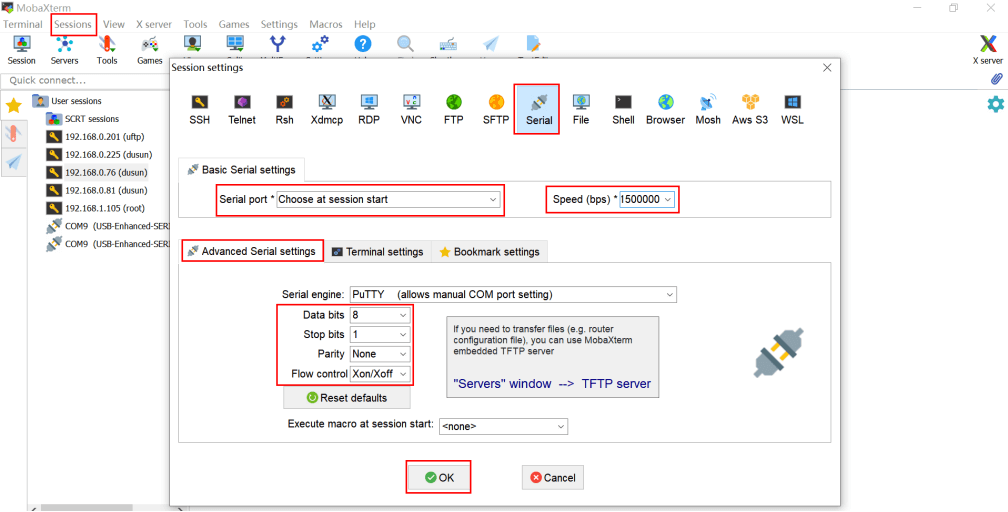
It is recommended to use MobaXterm to access, the recommended download address is:
https://mobaxterm.mobatek.net/download-home-edition.html
The effect after the tool opens the serial port is as follows:
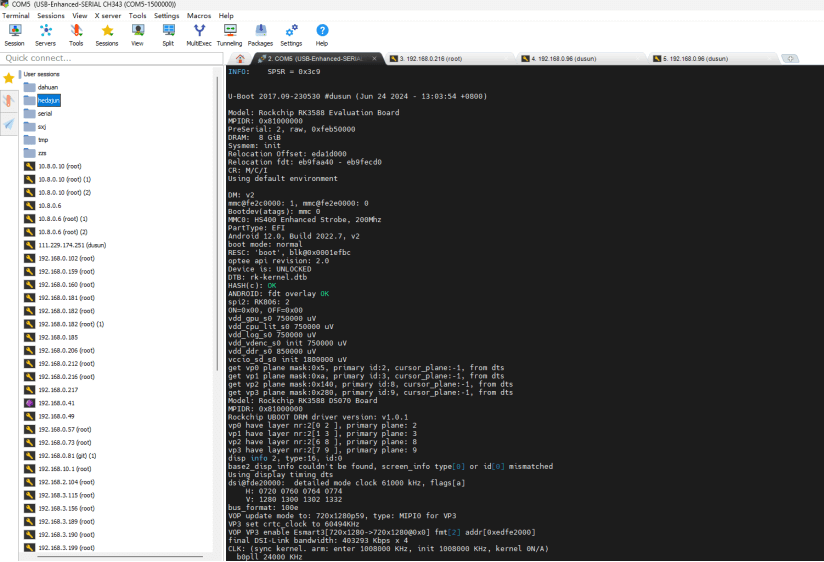
Debug serial port baud rate 57600
1) 8 data bits
2) 1 stop bit
3) No verification
4) No flow control
Please note that there is no 57600 in the serial port baud rate drop-down box. You need to enter it directly.
See the figure below for details.

Type has uart conversion
● Remove the spi flash from the board

● Put the flash on the SPI Flash burner, select the correct flash model, and then import the burning file
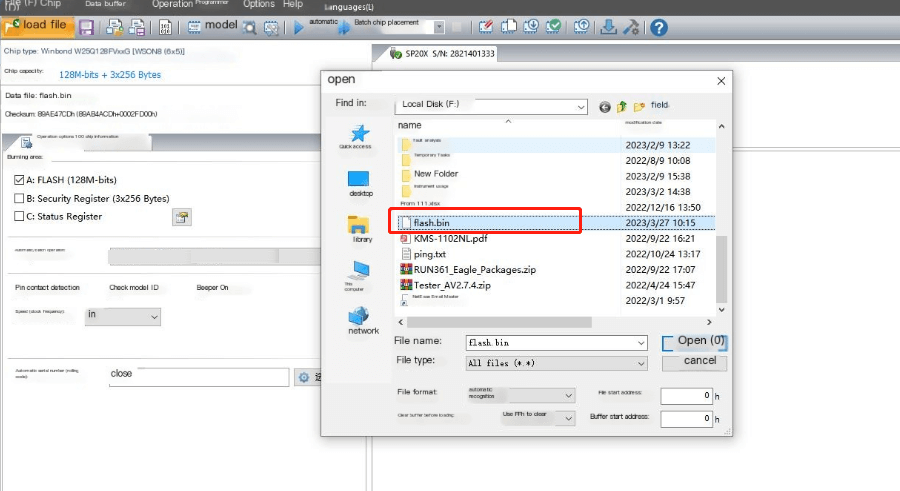
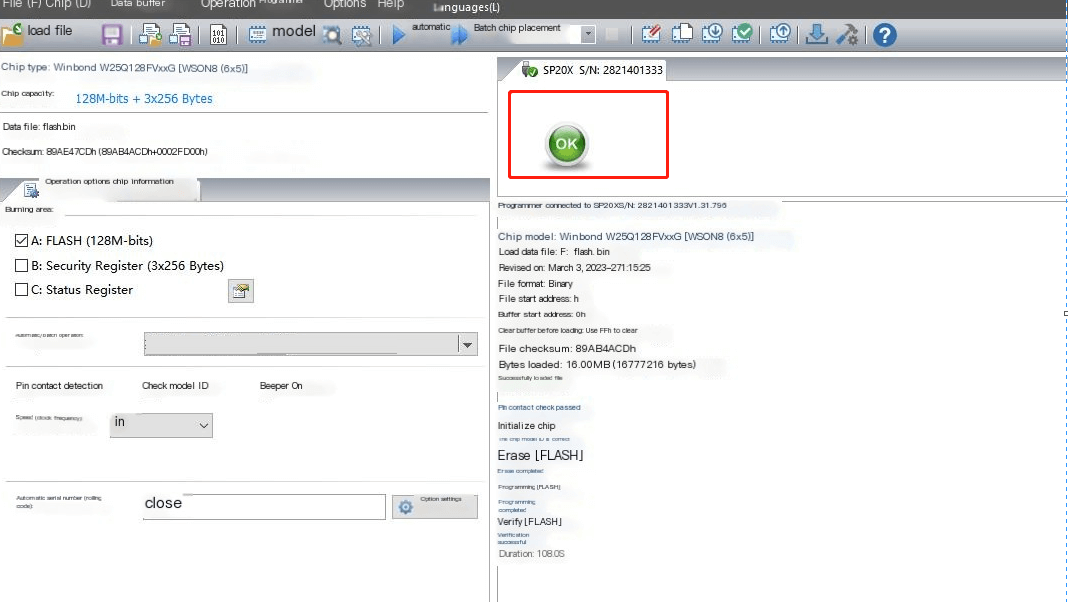
● Press Auto Burn


● Wait for the burning to be successful, then reattach the flash to the board
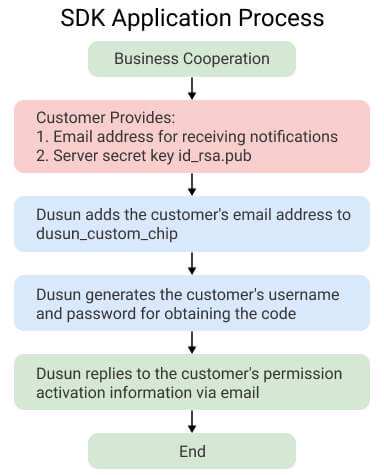
The SDK versions of Dusun’s different chip platforms need to be applied to the corresponding business end respectively. For example, your company has received the SDK for MT7628, and now there is a new project that requires the SDK for MT7621. We need to contact the corresponding business end of Dusun for business confirmation, and the business end will assist in the application. After approval by Dusun’s reviewers, the technical department can disclose information to your company.
Notice:
The SDK code management released by Dusun follows Google’s REPO method. Users are not recommended to delete the SDK’s REPO and GIT version records.
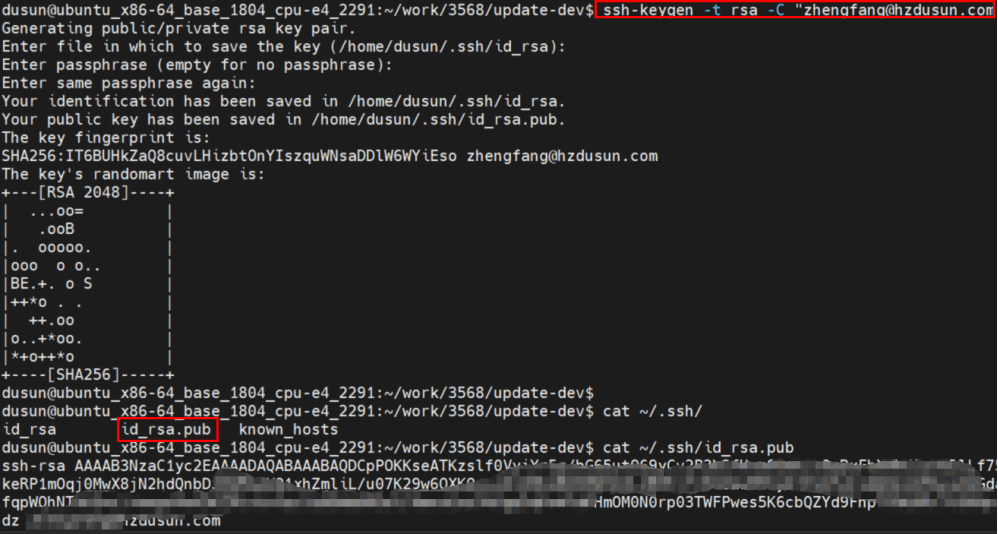
Enter on the server command line
ssh-keygen -t rsa -C " xxxx@xxxx.com "
2). Keep pressing Enter without entering any task characters;
3). After generating the key, email the ~/.ssh/id_rsa.pub file to Dusun
Enter on the server command line:
					git config --global user.email " You@example.com "
git config --global user.name "Your Name"
git clone ssh:// git@roombanker.x3322.net :2223/dusun_repo.git
					sudo cp -f ~/work/dusun_repo/repo /usr/bin/repo
sudo chmod +x /usr/bin/repo
					mkdir -p ~/work/project/dev
cd ~/work/project/dev
repo init -u ssh:// git@roombanker.x3322.net :2223/mtk7628_op/manifests_first.git -m linux.xml -b 090 --no-repo-verify
repo sync -c -j8
repo start master --all
					mkdir -p ~/workdir
tar zxvf DSGW030_sdk_AV4.8.332.49212613_zBE128.tar.gz -C ~/workdir/
cd ~/workdir/
./build.sh
					openwrt-ramips-mt76x8-DSI0177-squashfs-sysupgrade.binUpgrade the firmware for the system
[au@git openwrt]$ ls ./bin/targets/ramips/mt76x8/ -alh
total 138M
drwxr-xr-x 3 au au 4.0K Jun 1 2022 .
drwxr-xr-x 5 au au 48 Sep 30 2021 ..
-rw-r--r-- 1 au au 122 Mar 24 17:40 config.buildinfo
-rw-r--r-- 1 au au 263 Mar 24 17:40 feeds.buildinfo
-rw-r--r-- 1 au au 4.9K Mar 16 21:31 openwrt-ramips-mt76x8-device-dsgw090.manifest
-rw-r--r-- 1 au au 14M Mar 16 21:31 openwrt-ramips-mt76x8-DSI0177-squashfs-sysupgrade.bin
drwxr-xr-x 2 au au 12K Mar 24 17:12 packages
-rw-r--r-- 1 au au 2.8K Mar 24 17:41 sha256sums
-rw-r--r-- 1 au au 18 Mar 24 17:40 version.buildinfo
The wifi configuration under Openwrt is achieved by modifying the /etc/config/wireless configuration file.
					root@DSGW030:~# cat /etc/config/wireless
config wifi-device 'radio0'
    option type 'mac80211'
    option channel 'auto'
    option hwmode '11g'
    option noscan '1'
    option path 'platform/10300000.wmac'
    option htmode 'HT40'
config wifi-iface 'ap0'
    option device 'radio0'
    option network 'lan'
    option mode 'ap'
    option ssid 'Dusun-E3AD24-2.4G'
    option encryption 'psk2'
    option key '7BE3AD24'
					root@DSGW030:~# cat /etc/config/wireless
config wifi-device 'radio0'
    option type 'mac80211'
    option channel 'auto'
    option hwmode '11g'
    option noscan '1'
    option path 'platform/10300000.wmac'
    option htmode 'HT40'
config wifi-iface 'sta0'
    option device 'radio0'
    option network 'wwan0'
    option mode 'sta'
    option ssid 'AAAAAA'
    option encryption 'psk2'
    option key 'dl123456'

root@DSGW030:/root# cat /etc/config/network
... //Other content
    config interface 'wwan0'
    option proto 'dhcp'
    option metric '1'
    option ifname 'wlan0'
    option mtu '1492'
... //Other content
This gateway has only one WAN port, configured in /etc/config/network
					root@DSGW030:~# cat /etc/config/network
... //Other configuration
config device 'lan_wlan0_dev'
    option name 'wlan0'
    option macaddr '30:ae:7b:e3:ad:25'
config device 'lan_wlan1_dev'
    option name 'wlan1'
    option macaddr '30:ae:7b:e3:ad:25'
config interface 'wan'
    option ifname 'eth0'
    option proto 'dhcp'
    option mtu '1492'
config device 'wan_eth0_dev'
    option name 'eth0'
    option macaddr 'ff:ff:ff:ff:00:00'
config interface 'wan6'
    option ifname 'eth0'
    option proto 'dhcpv6'
// Other configuration
The default is DHCP mode. If you need to configure it to a static IP, you can configure it on the page. The configuration after configuration should be similar to the following
					root@DSGW030:~# cat /etc/config/network
... //Other configuration
config device 'lan_wlan0_dev'
    option name 'wlan0'
    option macaddr '30:ae:7b:e3:ad:25'
config device 'lan_wlan1_dev'
    option name 'wlan1'
    option macaddr '30:ae:7b:e3:ad:25'
config interface 'wan'
    option ifname 'eth0'
    option proto 'static'
    option ipaddr '192.168.100.33'
    option gateway '192.168.100.1'
    option netmask '255.255.255.0'
    option dns '192.168.100.1 '
    option mtu '1492'

config device 'wan_eth0_dev'
    option name 'eth0'
    option macaddr 'ff:ff:ff:ff:00:00'
config interface 'wan6'
    option ifname 'eth0'
    option proto 'dhcpv6'
// Other configuration
The motherboard has a software button by default, which can be modified according to customer needs.
By default, when the button is pressed, the system will call /etc/rc.button/BTN_0 script:
1). Short press and release to turn on the hotspot
2). Press and hold for 5 seconds and then release to restore the factory settings.
					#!/bin/sh
./lib/functions.sh
./lib/functions/leds.sh
if [ "${ACTION}" == "pressed" ];
then
    touch /tmp/BTN_0_pressed
    touch /tmp/btn1
else
    rm -f /tmp/BTN_0_pressed
fi

if [ -f /tmp/dusun_upgrade ] ; then
    exit 0
fi

[ ! "${ACTION}" == "released" ] && {
    exit 0
}

[ "$SEEN" -ge 5 ] && {
    logger "factory reset.."
    led_off zigbee
    led_off pwrled
    led_off errled
    led_timer zigbee 200 200
    led_timer pwrled 200 200
    led_timer errled 200 200
    logger "FACTORY RESET"
    #jffs2reset -y && reboot &
    firstboot -y && reboot &
    exit 0
}

[ "$SEEN" -ge 0 ] && {
    logger "Open Default Ap"
    uci set /etc/config/wireless.radio0.disabled=0; uci commit wireless;
    uci set /etc/config/wireless.ap0.hidden=0; uci commit wireless;
    #/etc/init.d/network restart;
    /etc/init.d/uhttpd restart
    Wi-Fi &
    exit 0
}
					echo none > /sys/class/leds/pwrled/trigger
echo 1 > /sys/class/leds/pwrled/brightness
					echo none > /sys/class/leds/pwrled/trigger
echo 0 > /sys/class/leds/pwrled/brightness
					echo timer > /sys/class/leds/pwrled/trigger
echo 500 > /sys/class/leds/pwrled/delay_on
echo 500 >/sys/class/leds/pwrled/delay_off
This board has a ble Bluetooth chip EFR32BG21, and the default ncp program is used
● By default, specific operations can be performed on the Bluetooth page of the luci page.
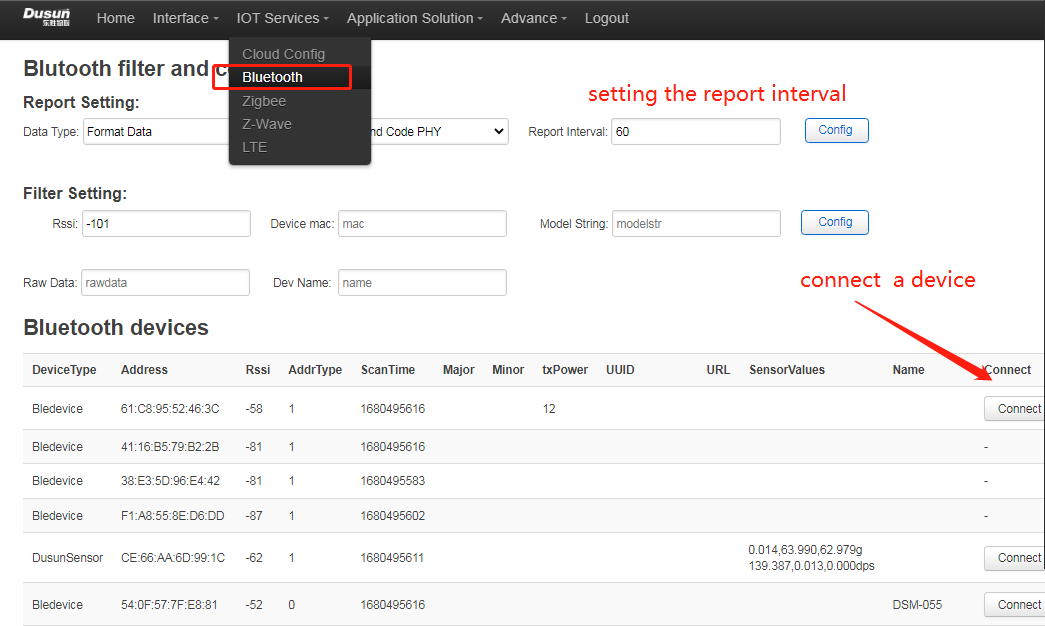
● If you want to debug the module manually, or write your own Bluetooth program, you need to stop the default Bluetooth program
/etc/init.d/beacond stop; killall -9 bul; killall -9 hciattach;
● Get tty device
					find /sys/bus/usb/devices/1-1.4:1.0/ -name "ttyUSB*" -maxdepth 1
/dev/ttyUSB0 //Here it is assumed to be ttyUSB0, the actual value shall prevail
● Get the version
/usr/bin/bflash -d /dev/ttyUSB0 -b115200 -r1
5. Relevant standards and certifications
Chinese Standard: GB/T 26572-2011
EU Standard: Directive 2011/65/EU
Note: The components used in the current product comply with ROHS standards
EU Standard: EU Regulation (EC) No 1907/2006 (REACH)
Note: The components used in the current product comply with REACH standards.
| 1 | Random vibration test | 1. Place 3 noodles on the platform for 30 minutes. 2. Place Noodle 1 on the platform for 10 minutes. 3. Place side 2 or side 4 on the platform for 10 minutes. 4. Place surface 5 or 6 on the platform for 10 minutes. 5. Frequency: 1…4…100…200 6. PSD: 0.0001…0.01…0.01…0.0001 |
There is no obvious damage to the box after the random vibration test |
| 2 | Fixed displacement test | Displacement: 25 mm Displacement times: 14200 ci |
There is no obvious damage to the box after the displacement test |
| 3 | Sinusoidal vibration test (packaging) |  |
1. The appearance, function and performance of the equipment under test meet the specifications of the relevant standards without obvious changes, and the functions of the equipment meet the requirements of Table 2. 2. Minor surface damage (such as scratches, nicks, etc.) of the sample meets the requirements. 3. Some parts of the sample (such as connectors) are allowed to have slight deformation, but this deformation cannot affect the mechanical and electrical properties of the device. |
| 4 | Sinusoidal vibration test (bare metal) |  |
1. The appearance, function and performance of the equipment under test meet the specifications of the relevant standards without obvious changes, and the functions of the equipment meet the requirements of Table 2. 2. Minor surface damage (such as scratches, nicks, etc.) of the sample meets the requirements. 3. Some parts of the sample (such as connectors) are allowed to have slight deformation, but this deformation cannot affect the mechanical and electrical properties of the device. |
| 1 | Package drop test | 1. Wt< 10 Kg, drop 97 cm, 2. Wt:10 ~ 19 Kg, drop 81 cm, 3. 19 ~ 28 Kg, drop 66 cm, 4. Test standard: one corner, three sides, six faces, ten drops in total.  |
There is no obvious damage to the box after the drop test |
| 2 | 1. Sample with normal function, no power supply 2. Drop mode: 6 sides, the drop sides are bottom, front, left, right, back and front in order; 3. Drop height a) Excluding display screen and optical engine products Free fall from a height of 100 cm onto a wooden floor no less than 3 cm thick b) Products containing display screens and optical engines Free fall from a height of 80cm onto a wooden floor no less than 3cm thick |
1. The appearance, function and performance of the equipment under test meet the specifications of the relevant standards without obvious changes, and the functions of the equipment meet the requirements of Table 2. 2. Minor surface damage (such as scratches, nicks, etc.) of the sample meets the requirements. 3. Some parts of the sample (such as connectors) are allowed to have slight deformation, but this deformation cannot affect the mechanical and electrical properties of the device. |
|
| 3 | Drop (Packaging) | 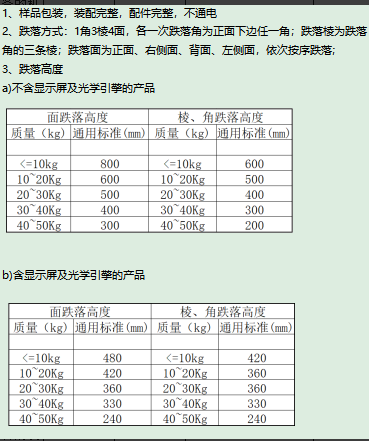 |
1. The appearance, function and performance of the equipment under test meet the specifications of the relevant standards without obvious changes, and the functions of the equipment meet the requirements of Table 2. 2. Minor surface damage (such as scratches, nicks, etc.) of the sample meets the requirements. 3. Some parts of the sample (such as connectors) are allowed to have slight deformation, but this deformation cannot affect the mechanical and electrical properties of the device. |
EU standards: EN55032:2015 + A11:2020 / EN55035:2017 + A11:2020 / ETSI EN 301489-1 V2.2.3 (2019-11) / ETSI EN 301489-X
Chinese Standard: GB/T 26572-2011
Note: The current product is designed strictly in accordance with EMC standards
The customer only needs to provide the application company information, and Dusun will be responsible for all the certification processes
The certification process is shown in the following example (CE certification):
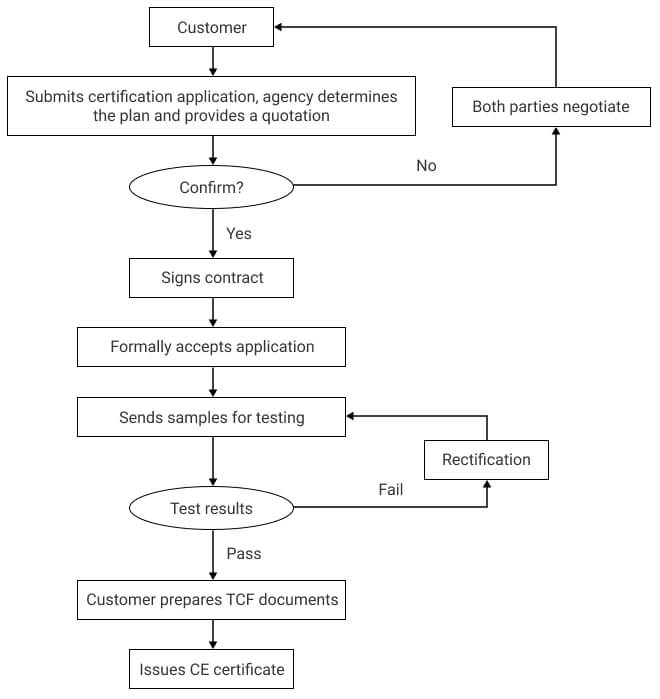
① Dusun provides certification related materials, the list of materials is as follows (contact the project leader, who will coordinate and organize the materials):
1). BOM list (all in English)
2). Body Label
3). Block diagram
4). Parts placement
5). PCB layout
6). Schematic diagram SCH
7). User manual
8). Antenna Specifications
9). List of key safety components (with safety component certificates, such as relays, fuses, terminal blocks, etc.)
10). PCB-UL certificate
② Dusun provides certification technical support (fixed frequency, safety regulations, EMC)
Contact the project leader, who will coordinate with relevant technical personnel to provide technical support
6. Order
⚠️:Order sub-model and corresponding product description

