1. Smart Programmable Heating Thermostat Introduction
A simple, easy to use smart programmable thermostat has the features you want, such as a large touch-screen display and Smart Response Technology. You set it up to adjust the temperature when you are away or asleep-times when you don’t necessarily need to heat or cool your home to optimum comfort-and your HVAC equipment and heat pump runs less.
It automatically adjusts the heating/cooling of your home, so you’re comfortable at your programmed times. With Auto Change from Heat to Cool, the switch from heating to cooling is automatic.
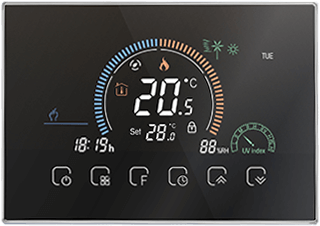
- Negative black screen will bring you to a secret world
- 4.8 inch large colorful display creates your colorful life.
- Touch buttons to make simple operation
- Amazing silver frame opens your modern life.
- The visible thickness above the wall is only 2cm(0.787inch)
- The snap connection allows you to easily install.
- Wall mounted or suitable for the installation of Europe, China, Japan USA and Italy etc..
- White, black or brushed stainless steel for your selection.
- Wrap-around cooling holes help heat to escape quickly and increase the temperature sensing accuracy.
- 12 terminals are available for many systems.
- Powerful functions are available such as Zigbee, Wi-Fi etc..
- 0.5 °C / 1°F accuracy keeps the temperature within the level you set.
- °C or °F choice
- 7 day programmable (each day can be set different)
- Temporary programmable
- Holiday mode: make you enjoy a more comfortable temperature in holiday
- All setting languages synchronize your time zone, address, and language
- No limit to add thermostats in App.
- Support Smart Scene.
- Support to make two stage groups.
- Support device sharing.
- Support 3H2C Heat Pump system and 2H2C conventional system etc..
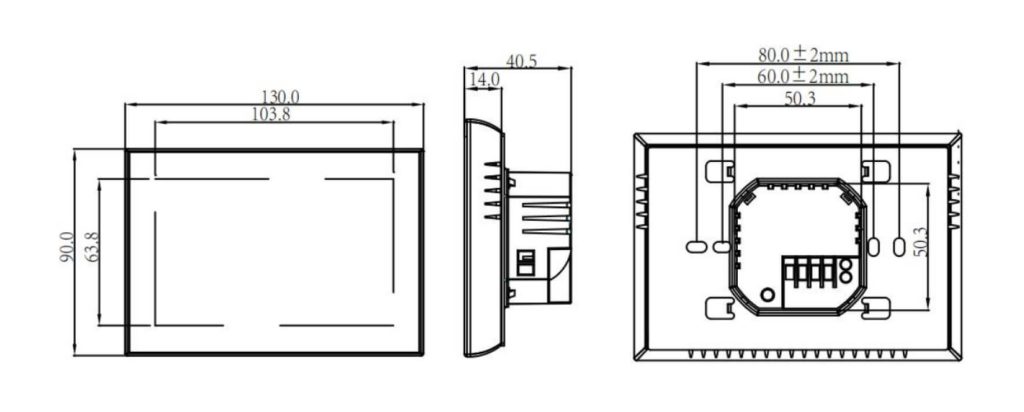
2. Dimension of Smart Programmable Heating Thermostat
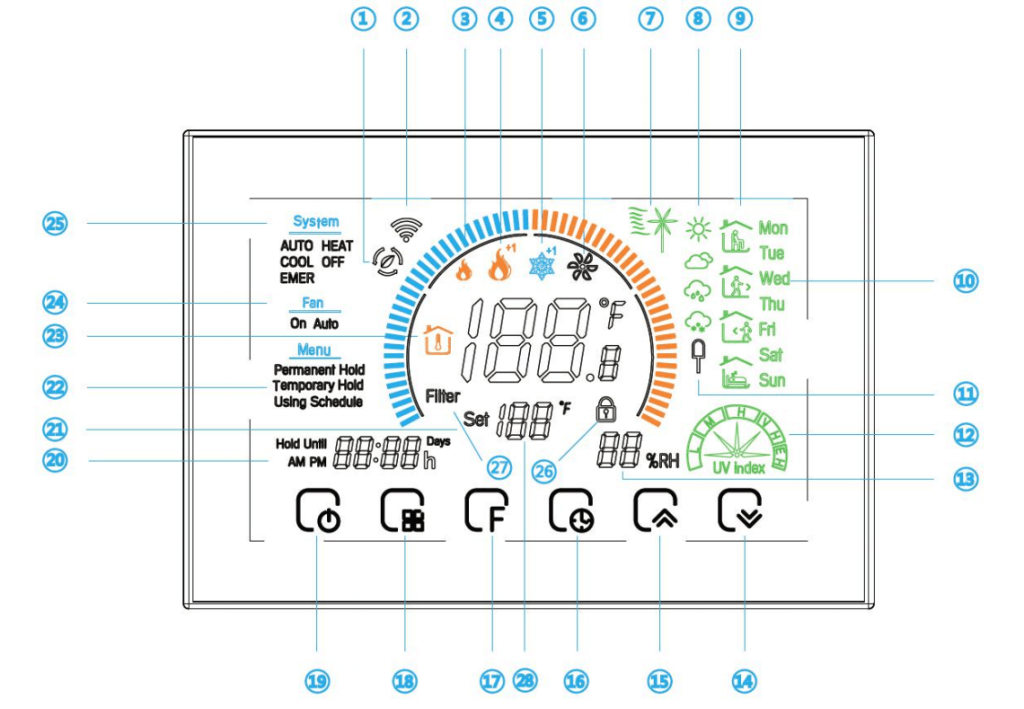
3. Home screen quick reference
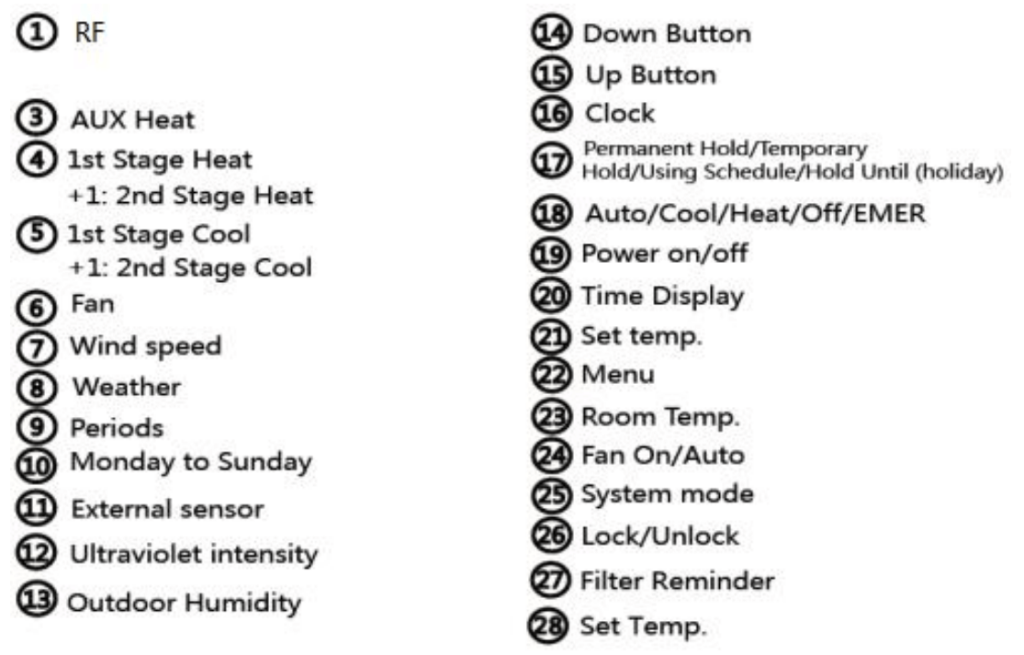
4. Technical data of Smart Programmable Heating Thermostat
| Category | Specifications |
|---|---|
| Power | 95 ~ 240 VAC, 50 ~ 60HZ |
| Sensor | NTC3950, 10K |
| Current Load | 1A(Inductive) 3A(Resistance) |
| Product Type | Heat Pump Thermostat |
| Power consumption | <1.5W |
| Set Temp. Range | 5 -35°C |
| Accuracy | ±1°C |
| Display Temp. Range | 5~99℃ |
| Ambient Temp | 0 ~ 45°C |
| Ambient Humidity | 5 ~95%RH(Non-Condensing) |
| Storage Temp | -5~45°C |
| Protocol | Zigbee 3.0 |
| Report interval | Current temperature : 1min OTA request : 3min Setting temperature:15min ON/OFF status: 15min |
| Zigbee Performance | TX Power: 10dBm Range: 100 meters minimum, open filed Receiving Sensibility: <-89dBm Frequency offset: +/-50KHz Frequency Range (MHz):2401.0~2483.5 E.i.r.p (Equivalent Isotropically Radiated power) (mw)<100mw Bandwidth (MHz):5MHz Modulation: OQPSK |
| Installation | Wall-mounted |
5. Before wiring and installing
The thermostat is suitable for installation within a standard 86mm pattress box or European 60mm pattress box.
Step 1.Keep the power off.
Step 2.Remove the mounting plate,by rotating the LCD part
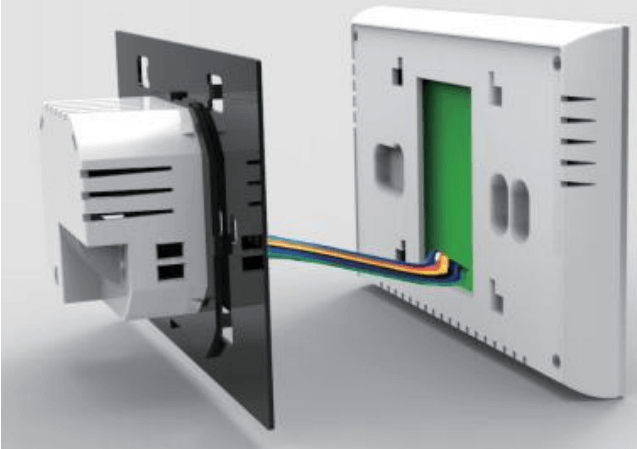
Step 3.Connect power supply, load into the appropriate terminals.
Step 4.Fix the mounting plate into the wall with screw in.

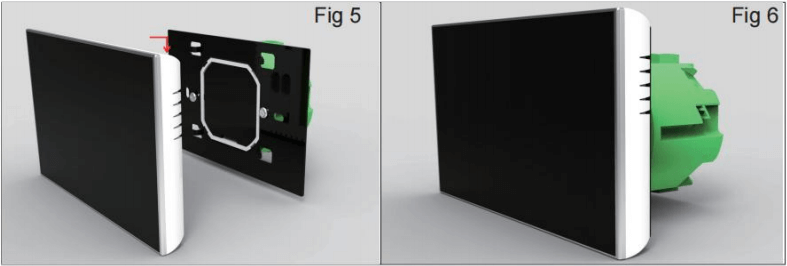
Step 5.Fasten body of thermostat and the mounting plate though rotating.
Step 6.Installation complete
6. Operation
Press ![]() to turn off the thermostat . and then press and hold
to turn off the thermostat . and then press and hold ![]() 10s to enter the pairing mode. The backlight will be on and the
10s to enter the pairing mode. The backlight will be on and the![]() will be flash 1Hz in the pairing mode. This process will last 90 seconds.
will be flash 1Hz in the pairing mode. This process will last 90 seconds.
If the timeout is exceeded, the device screen goes out for 20s.
Press![]() to turn the thermostat on/off.
to turn the thermostat on/off.
Press to set the Permanent Hold, Temporary Hold, Using Schedule, These functions will appear on the screen.
Permanent Hold – Manual. In this mode, Press / to set temperature.
Temporary Hold. During Using Schedule or in this mode, Touch / to set the temporary temp.. It will be valid all the start time of the next scheduled period.
Using Schedule. 7 days a week, 6 periods programmable daily.
Press![]() till the min of time will flashes; Touch the icon
till the min of time will flashes; Touch the icon ![]() to set your minute;
to set your minute;
Then press![]() , the hour of time will flash; touch the icon
, the hour of time will flash; touch the icon ![]() to set your hour;
to set your hour;
Then press![]() , the week of time will flash; touch the icon
, the week of time will flash; touch the icon ![]() to set your week;
to set your week;
Press ![]() four times in a row.
four times in a row.
Press ![]() until the weekday schedule settings appear
until the weekday schedule settings appear
Use the ![]() arrows to adjdust the on time.
arrows to adjdust the on time.
Press the icon ![]() and use the
and use the ![]() arrows to set the off time
arrows to set the off time
Press the icon ![]() and use the
and use the ![]() arrows to set the temp
arrows to set the temp
Repeat this process for periods 3 4 and 5 6.
Press the icon ![]() once more to enter the Saturday schedule settings (6 will show along the top of the screen).
once more to enter the Saturday schedule settings (6 will show along the top of the screen).
Repeat the above process to set the period and temp. and Sunday schedule.
Press ![]() once more to confirm and exit.
once more to confirm and exit.
Press and hold the![]() and
and ![]() for 3 seconds to lock/unlock your thermostat
for 3 seconds to lock/unlock your thermostat
Press and hold![]() for 5 sec. in the order to reach system function. Then press to scroll through the available functions,and use the
for 5 sec. in the order to reach system function. Then press to scroll through the available functions,and use the ![]() arrows to change the available options. All settings are confirmed automatically.
arrows to change the available options. All settings are confirmed automatically.
Remark: It takes 20s to save the setting information, if disconnect the power of the device within this time, it may cause the setting information to be lost
| Code | Function | Setting and options | Default |
|---|---|---|---|
| 1 | Temperature Calibration | -9℃ to 9℃ | 0℉ |
| 2 | Dead zone temperature | 1 to 5°C | 01 |
| 3 | Time display | 0: 12-hour clock; 1: 24-hour clock |
1 |
| 4 | Button Locking | 00:All buttons are locked except power button 01:All buttons are locked |
00 |
| 5 | Sensor types | In:Internal Sensor Ou:External Sensor AL:Internal/External Sensor |
AL |
| 6 | Minimum setting temperature | 5℃ to 15℃ | 5℃ |
| 7 | Maximum setting temperature | 5℃ to 45℃ | 35℃ |
| 8 | Standby screen brightness | 3-99 | 4 |
| 9 | Energy saving Mode | 00:Energy saving Mode 01:Non-energy saving Mode | 00 |
| A | Energy saving Temp | 0-30℃ | 20 |
| B | High temperature protection setting | 25-70℃ | 45 |
| C | Low temperature protection setting | 0-10℃ | 0 |
7. Protocol
See the files《DSHT-040-1-220-ClusterAndAttribute》

